Jenkins CI service (FREE)
Moved to GitLab Free in 13.7.
From GitLab, you can trigger a Jenkins build when you push code to a repository, or when a merge request is created. In return, the Jenkins pipeline status is shown on merge requests widgets and on the GitLab project's home page.
To better understand the GitLab Jenkins integration, watch the following video:
Use the Jenkins integration with GitLab when:
- You plan to migrate your CI from Jenkins to GitLab CI/CD in the future, but need an interim solution.
- You're invested in Jenkins Plugins and choose to keep using Jenkins to build your apps.
For a real use case, read the blog post Continuous integration: From Jenkins to GitLab using Docker.
Moving from a traditional CI plug-in to a single application for the entire software development life cycle can decrease hours spent on maintaining toolchains by 10% or more. For more details, see the 'GitLab vs. Jenkins' comparison page.
NOTE: This documentation focuses only on how to configure a Jenkins integration with GitLab. Learn how to migrate from Jenkins to GitLab CI/CD in our Migrating from Jenkins documentation.
Configure GitLab integration with Jenkins
The GitLab Jenkins integration requires installation and configuration in both GitLab and Jenkins. In GitLab, you need to grant Jenkins access to the relevant projects. In Jenkins, you need to install and configure several plugins.
GitLab requirements
Jenkins requirements
Grant Jenkins access to GitLab project
Grant a GitLab user access to the select GitLab projects.
-
Create a new GitLab user, or choose an existing GitLab user.
This account is used by Jenkins to access the GitLab projects. We recommend creating a GitLab user for only this purpose. If you use a person's account, and their account is deactivated or deleted, the GitLab-Jenkins integration stops working.
-
Grant the user permission to the GitLab projects.
If you're integrating Jenkins with many GitLab projects, consider granting the user global Administrator permission. Otherwise, add the user to each project, and grant Developer permission.
Configure GitLab API access
Create a personal access token to authorize Jenkins' access to GitLab.
- Sign in to GitLab as the user to be used with Jenkins.
- In the top-right corner, select your avatar.
- Select Edit profile.
- In the left sidebar, select Access Tokens.
- Create a personal access token with the API scope checkbox checked. For more details, see Personal access tokens.
- Record the personal access token's value, because it's required in Configure the Jenkins server section.
Configure the Jenkins server
Install and configure the Jenkins plugin. The plugin must be installed and configured to authorize the connection to GitLab.
- On the Jenkins server, go to Manage Jenkins > Manage Plugins.
- Install the Jenkins GitLab Plugin.
- Go to Manage Jenkins > Configure System.
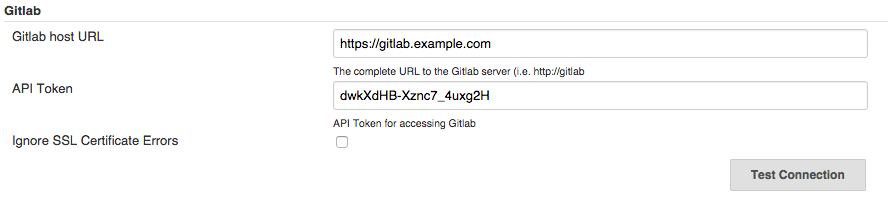
- In the GitLab section, check the Enable authentication for ‘/project’ end-point checkbox.
- Click Add, then choose Jenkins Credential Provider.
- Choose GitLab API token as the token type.
- Enter the GitLab personal access token's value in the API Token field and click Add.
- Enter the GitLab server's URL in the GitLab host URL field.
- Click Test Connection, ensuring the connection is successful before proceeding.
For more information, see GitLab Plugin documentation about Jenkins-to-GitLab authentication.
Configure the Jenkins project
Set up the Jenkins project you intend to run your build on.
- On your Jenkins instance, go to New Item.
- Enter the project's name.
- Choose between Freestyle or Pipeline and click OK. We recommend a Freestyle project, because the Jenkins plugin updates the build status on GitLab. In a Pipeline project, you must configure a script to update the status on GitLab.
- Choose your GitLab connection from the dropdown.
- Check the Build when a change is pushed to GitLab checkbox.
- Check the following checkboxes:
- Accepted Merge Request Events
- Closed Merge Request Events
- Specify how build status is reported to GitLab:
-
If you created a Freestyle project, in the Post-build Actions section, choose Publish build status to GitLab.
-
If you created a Pipeline project, you must use a Jenkins Pipeline script to update the status on GitLab.
Example Jenkins Pipeline script:
pipeline {
   agent any

   stages {
      stage('gitlab') {
         steps {
            echo 'Notify GitLab'
            updateGitlabCommitStatus name: 'build', state: 'pending'
            updateGitlabCommitStatus name: 'build', state: 'success'
         }
      }
   }
}
-
Configure the GitLab project
Configure the GitLab integration with Jenkins.
Option 1: Jenkins integration (recommended)
-
Create a new GitLab project or choose an existing one.
-
Go to Settings > Integrations, then select Jenkins CI.
-
Turn on the Active toggle.
-
Select the events you want GitLab to trigger a Jenkins build for:
- Push
- Merge request
- Tag push
-
Enter the Jenkins URL.
-
Enter the Project name.
The project name should be URL-friendly, where spaces are replaced with underscores. To ensure the project name is valid, copy it from your browser's address bar while viewing the Jenkins project.
-
Enter the Username and Password if your Jenkins server requires authentication.
-
Click Test settings and save changes. GitLab tests the connection to Jenkins.
Option 2: Webhook
If you are unable to provide GitLab with your Jenkins server login, you can use this option to integrate GitLab and Jenkins.
- In the configuration of your Jenkins job, in the GitLab configuration section, click Advanced.
- Click the Generate button under the Secret Token field.
- Copy the resulting token, and save the job configuration.
- In GitLab, create a webhook for your project, enter the trigger URL (such as
https://JENKINS_URL/project/YOUR_JOB) and paste the token in the Secret Token field. - After you add the webhook, click the Test button, and it should succeed.
Troubleshooting
Error in merge requests - "Could not connect to the CI server"
This integration relies on Jenkins reporting the build status back to GitLab via the Commit Status API.
The error 'Could not connect to the CI server' usually means that GitLab did not receive a build status update via the API. Either Jenkins was not properly configured or there was an error reporting the status via the API.
- Configure the Jenkins server for GitLab API access
- Configure the Jenkins project, including the 'Publish build status to GitLab' post-build action.
Merge Request event does not trigger a Jenkins Pipeline
Check service hook logs for request failures or check the /var/log/gitlab/gitlab-rails/production.log file for messages like:
WebHook Error => Net::ReadTimeoutor
WebHook Error => execution expiredIf those are present, the request is exceeding the webhook timeout, which is set to 10 seconds by default.
To fix this the gitlab_rails['webhook_timeout'] value must be increased
in the gitlab.rb configuration file, followed by the gitlab-ctl reconfigure command.
If you don't find the errors above, but do find duplicate entries like below (in /var/log/gitlab/gitlab-rail),
webhook requests may be timing out:
2019-10-25_04:22:41.25630 2019-10-25T04:22:41.256Z 1584 TID-ovowh4tek WebHookWorker JID-941fb7f40b69dff3d833c99b INFO: start
2019-10-25_04:22:41.25630 2019-10-25T04:22:41.256Z 1584 TID-ovowh4tek WebHookWorker JID-941fb7f40b69dff3d833c99b INFO: start