Repository (FREE)
A repository is what you use to store your codebase in GitLab and change it with version control. A repository is part of a project, which has a lot of other features.
Create a repository
To create a new repository, all you need to do is create a new project or fork an existing project.
Once you create a new project, you can add new files via UI (read the section below) or via command line. To add files from the command line, follow the instructions that will be presented on the screen when you create a new project, or read through them in the command line basics documentation.
Important: For security reasons, when using the command line, we strongly recommend that you connect with GitLab via SSH.
Files
Use a repository to store your files in GitLab. In GitLab 12.10 and later, you'll see on the repository's file tree an icon next to the filename according to its extension:
![]()
Create and edit files
Host your codebase in GitLab repositories by pushing your files to GitLab. You can either use the user interface (UI), or connect your local computer with GitLab through the command line.
To configure GitLab CI/CD to build, test, and deploy
your code, add a file called .gitlab-ci.yml
to your repository's root.
From the user interface:
The GitLab UI allows you to perform lots of Git commands without having to touch the command line. Even if you use the command line regularly, sometimes it's easier to do so via GitLab UI:
- Create a file
- Upload a file
- File templates
- Create a directory
- Start a merge request
- Find file history
- Identify changes by line (Git blame)
From the command line:
To get started with the command line, please read through the command line basics documentation.
Find files
Use the GitLab file finder to search for files in a repository.
Supported markup languages and extensions
GitLab supports a number of markup languages (sometimes called lightweight markup languages) that you can use for the content of your files in a repository. They are mostly used for documentation purposes.
Just pick the right extension for your files and GitLab will render them according to the markup language.
| Markup language | Extensions |
|---|---|
| Plain text | txt |
| Markdown |
mdown, mkd, mkdn, md, markdown
|
| reStructuredText | rst |
| AsciiDoc |
adoc, ad, asciidoc
|
| Textile | textile |
| Rdoc | rdoc |
| Org mode | org |
| creole | creole |
| MediaWiki |
wiki, mediawiki
|
Repository README and index files
When a README or index file is present in a repository, its contents will be
automatically pre-rendered by GitLab without opening it.
They can either be plain text or have an extension of a supported markup language:
Some things to note about precedence:
- When both a
READMEand anindexfile are present, theREADMEwill always take precedence. - When more than one file is present with different extensions, they are
ordered alphabetically, with the exception of a file without an extension
which will always be last in precedence. For example,
README.adocwill take precedence overREADME.md, andREADME.rstwill take precedence overREADME.
Jupyter Notebook files
Jupyter Notebook (previously IPython Notebook) files are used for interactive computing in many fields and contain a complete record of the user's sessions and include code, narrative text, equations, and rich output.
Read how to use Jupyter notebooks with GitLab.
OpenAPI viewer
Introduced in GitLab 12.6.
GitLab can render OpenAPI specification files with its file viewer, provided
their filenames include openapi or swagger and their extension is yaml,
yml, or json. The following examples are all correct:
openapi.ymlopenapi.yamlopenapi.jsonswagger.ymlswagger.yamlswagger.jsongitlab_swagger.ymlopenapi_gitlab.ymlOpenAPI.YMLopenapi.Yamlopenapi.JSONopenapi.gitlab.ymlgitlab.openapi.yml
Then, to render them:
- Navigate to the OpenAPI file in your repository in the GitLab UI.
- Click the "Display OpenAPI" button which is located between the "Display source" and "Edit" buttons (when an OpenAPI file is found, it replaces the "Display rendered file" button).
Branches
For details, see Branches.
Commits
When you commit your changes, you are introducing those changes to your branch. Via command line, you can commit multiple times before pushing.
-
Commit message:
A commit message is important to identity what is being changed and,
more importantly, why. In GitLab, you can add keywords to the commit
message that will perform one of the actions below:
- Trigger a GitLab CI/CD pipeline: If you have your project configured with GitLab CI/CD, you will trigger a pipeline per push, not per commit.
-
Skip pipelines:
You can add to you commit message the keyword
[ci skip]and GitLab CI/CD will skip that pipeline. - Cross-link issues and merge requests: Cross-linking is great to keep track of what's is somehow related in your workflow. If you mention an issue or a merge request in a commit message, they will be shown on their respective thread.
- Cherry-pick a commit: In GitLab, you can cherry-pick a commit right from the UI.
- Revert a commit: Easily revert a commit from the UI to a selected branch.
- Sign a commit: Use GPG to sign your commits.
Project and repository size
A project's size is reported on the project's Details page. The reported size is updated every 15 minutes at most, so may not reflect recent activity. The displayed files size includes repository files, artifacts, and LFS.
The project size may differ slightly from one instance to another due to compression, housekeeping, and other factors.
Repository size limit may be set by administrators. GitLab.com's repository size limit is set by GitLab.
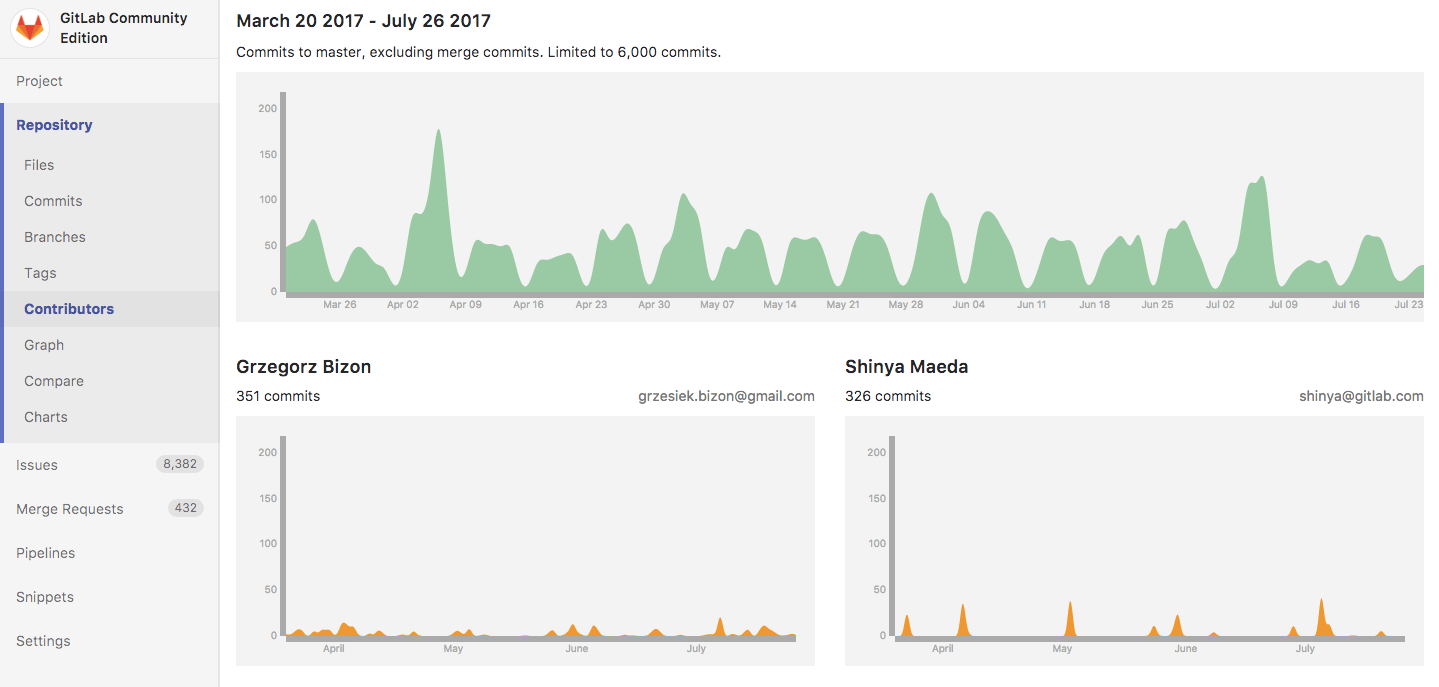
Contributors
All the contributors to your codebase are displayed under your project's Settings > Contributors.
They are ordered from the collaborator with the greatest number of commits to the fewest, and displayed on a nice graph:
Repository graph
The repository graph displays the history of the repository network visually, including branches and merges. This can help you visualize the Git flow strategy used in the repository:
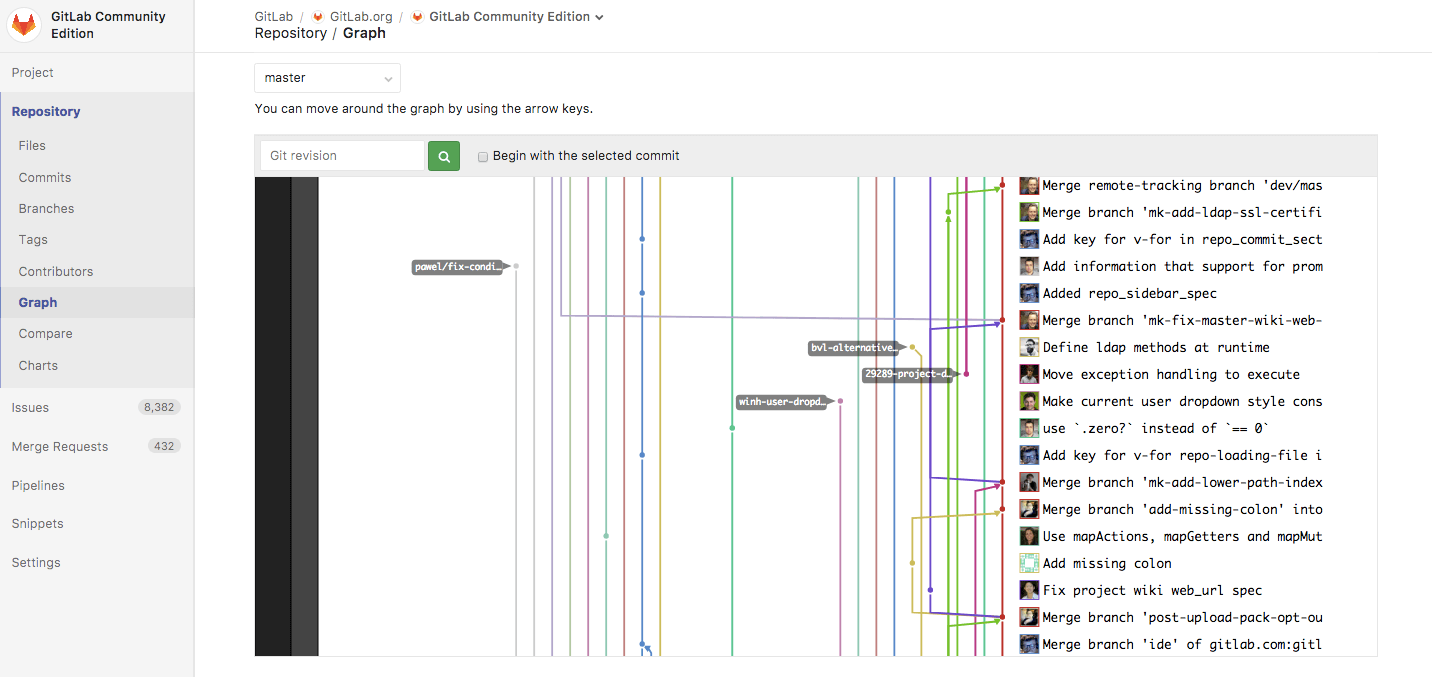
Find it under your project's Repository > Graph.
Repository Languages
For the default branch of each repository, GitLab will determine what programming languages were used and display this on the projects pages. If this information is missing, it will be added after updating the default branch on the project. This process can take up to 5 minutes.
Not all files are detected, among others; documentation,
vendored code, and most markup languages are excluded. This behavior can be
adjusted by overriding the default. For example, to enable .proto files to be
detected, add the following to .gitattributes in the root of your repository.
*.proto linguist-detectable=trueLocked files (PREMIUM)
Use File Locking to lock your files to prevent any conflicting changes.
Repository's API
You can access your repositories via repository API.
Clone a repository
Learn how to clone a repository through the command line.
Alternatively, clone directly into a code editor as documented below.
Clone and open in Apple Xcode
Introduced in GitLab 11.0.
Projects that contain a .xcodeproj or .xcworkspace directory can now be cloned
into Xcode on macOS. To do that:
- From the GitLab UI, go to the project's overview page.
- Click Clone.
- Select Xcode.
The project will be cloned onto your computer in a folder of your choice and you'll be prompted to open in XCode.
Clone and open in Visual Studio Code
Introduced in GitLab 13.8.
All projects can be cloned into Visual Studio Code. To do that:
- From the GitLab UI, go to the project's overview page.
- Click Clone.
- Select VS Code
You'll be prompted to select a folder to clone the project into. When VS Code has successfully cloned your project, it will open the folder.
Download Source Code
- Support for directory download was introduced in GitLab 11.11.
- Support for including Git LFS blobs was introduced in GitLab 13.5.
The source code stored in a repository can be downloaded from the UI. By clicking the download icon, a dropdown will open with links to download the following:
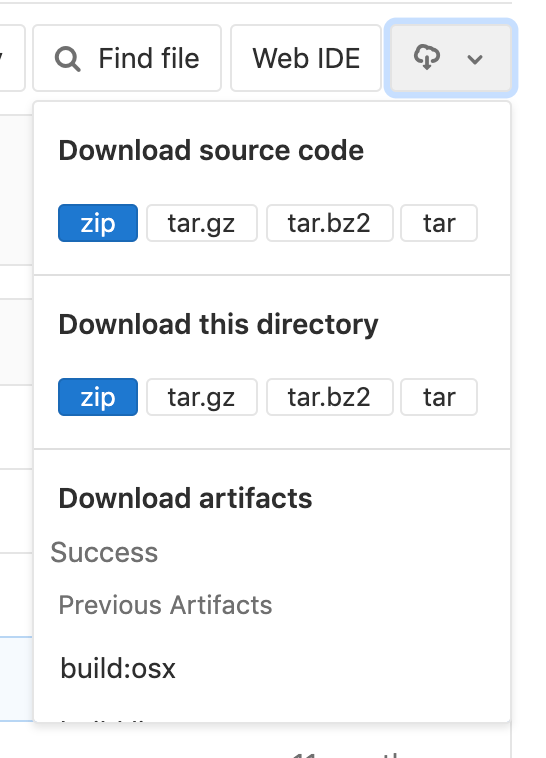
-
Source code:
allows users to download the source code on branch they're currently
viewing. Available extensions:
zip,tar,tar.gz, andtar.bz2. -
Directory:
only shows up when viewing a sub-directory. This allows users to download
the specific directory they're currently viewing. Also available in
zip,tar,tar.gz, andtar.bz2. - Artifacts: allows users to download the artifacts of the latest CI build.
Redirects when changing repository paths
When a repository path changes, it is essential to smoothly transition from the old location to the new one. GitLab provides two kinds of redirects: the web UI and Git push/pull redirects.
Depending on the situation, different things apply.
When renaming a user, changing a group path or renaming a repository:
- Existing web URLs for the namespace and anything under it (such as projects) will redirect to the new URLs.
- Starting with GitLab 10.3, existing Git remote URLs for projects under the namespace redirect to the new remote URL. Every time you push/pull to a repository that has changed its location, a warning message to update your remote is displayed instead of rejecting your action. This means that any automation scripts, or Git clients continue to work after a rename, making any transition a lot smoother.
- The redirects are available as long as the original path is not claimed by another group, user or project.