Get started with GitLab CI/CD (FREE)
Use this document to get started with GitLab continuous integration.
Before you start, make sure you have:
- A project in GitLab that you would like to use CI/CD for.
- Maintainer or owner access for the project.
If you are migrating from another CI/CD tool, view this documentation:
CI/CD process overview
To use GitLab CI/CD:
- Ensure you have runners available to run your jobs. If you don't have a runner, install GitLab Runner and register a runner for your instance, project, or group.
-
Create a
.gitlab-ci.ymlfile at the root of your repository. This file is where you define your CI/CD jobs.
When you commit the file to your repository, the runner runs your jobs. The job results are displayed in a pipeline.
Ensure you have runners available
In GitLab, runners are agents that run your CI/CD jobs.
You might already have runners available for your project, including shared runners, which are available to all projects in your GitLab instance.
To view available runners:
- Go to Settings > CI/CD and expand Runners.
As long as you have at least one runner that's active, with a green circle next to it, you have a runner available to process your jobs.
If no runners are listed on the Runners page in the UI, you or an administrator must install GitLab Runner and register at least one runner.
If you are testing CI/CD, you can install GitLab Runner and register runners on your local machine. When your CI/CD jobs run, they run on your local machine.
Create a .gitlab-ci.yml file
The .gitlab-ci.yml file is a YAML file where
you configure specific instructions for GitLab CI/CD.
In this file, you define:
- The structure and order of jobs that the runner should execute.
- The decisions the runner should make when specific conditions are encountered.
For example, you might want to run a suite of tests when you commit to
any branch except master. When you commit to master, you want
to run the same suite, but also publish your application.
All of this is defined in the .gitlab-ci.yml file.
To create a .gitlab-ci.yml file:
-
Go to Project overview > Details.
-
Above the file list, select the branch you want to commit to, click the plus icon, then select New file:

-
For the Filename, type
.gitlab-ci.ymland in the larger window, paste this sample code:build-job: stage: build script: - echo "Hello, $GITLAB_USER_LOGIN!" test-job1: stage: test script: - echo "This job tests something" test-job2: stage: test script: - echo "This job tests something, but takes more time than test-job1." - echo "After the echo commands complete, it runs the sleep command for 20 seconds" - echo "which simulates a test that runs 20 seconds longer than test-job1" - sleep 20 deploy-prod: stage: deploy script: - echo "This job deploys something from the $CI_COMMIT_BRANCH branch."$GITLAB_USER_LOGINand$CI_COMMIT_BRANCHare predefined variables that populate when the job runs. -
Click Commit changes.

The pipeline starts when the commit is committed.
.gitlab-ci.yml tips
-
If you want the runner to use a Docker image to run the jobs, edit the
.gitlab-ci.ymlfile to include your image name:default: image: ruby:2.7.2This command tells the runner to use a Ruby image from Docker Hub.
-
To validate your
.gitlab-ci.ymlfile, use the CI Lint tool, which is available in every project. -
You can also use CI/CD configuration visualization to view a graphical representation of your
.gitlab-ci.ymlfile. -
For the complete
.gitlab-ci.ymlsyntax, see the.gitlab-ci.ymlreference topic.
View the status of your pipeline and jobs
When you committed your changes, a pipeline started.
To view your pipeline:
-
Go CI/CD > Pipelines.
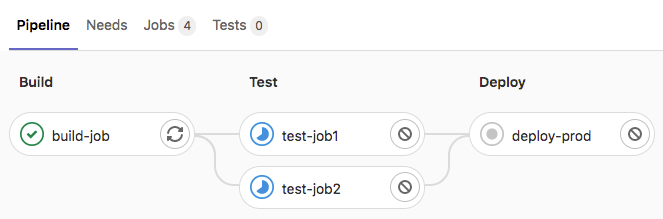
A pipeline with three stages should be displayed:
-
To view a visual representation of your pipeline, click the pipeline ID.
-
To view details of a job, click the job name, for example,
deploy-prod.

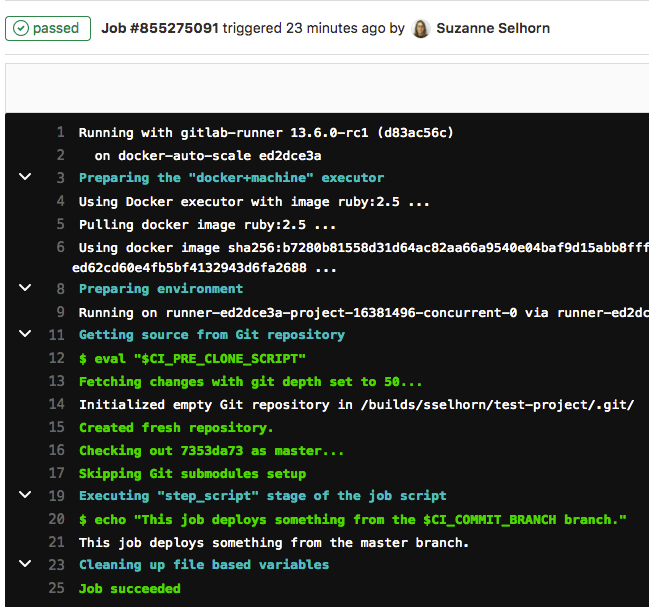
If the job status is stuck, check to ensure a runner is probably configured for the project.